
")


Screens
Under fliken Screens hanterar du distributionen av innehåll, både till enskilda skärmar och till hela skärmgrupper, smidigt och överskådligt. Avsnittet går igenom allt du behöver känna till för att få ut det mesta av PicFlow sett till hantering av skärmar, där det mest centrala och själva hjärtat i PicFlow, självklart handlar om publicering.
Vad är Screens?
Flödet för att visa upp skärminnehåll i PicFlow kan beskrivas som att varje skärm tilldelas en layout. Layouten i sin tur har areas, och dessa areas fyller vi med innehåll. Innehåll kan vara mediefiler, så som bilder och rörligt material, eller templates, som vi bygger av olika widgets.
I fliken Screens hanterar du publiceringen av innehåll till dina skärmar. Här har du möjlighet att distribuera innehåll till en enskild skärm eller till flera skärmar samtidigt, vilket gör det enkelt att säkerställa att rätt budskap visas på rätt plats, i rätt tid.
Navigera till Screens

Navigera till Screens via den gula sidebaren till vänster på skärmen.
Screen Groups
Screen Groups, skärmgrupper, ger dig möjlighet att organisera skärmar i hanterbara grupper. Denna funktion är användbar för att kategorisera dina skärmar efter adresser, byggnader, orientering på skärmar, eller andra kriterier som är relevanta för din organisation.

Du hittar dina skärmgrupper i den vänstra delen av skärmen.
💡 I detta exempel har vi skapat en huvudgrupp, “Alla Skärmar” som alla övriga grupper placeras i.
Ett bra tips för att uppnå en bra struktur!
Skapa en skärmgrupp

Klicka på plustecknet till höger om rubriken “Groups” i Groups-sektionen av skärmen. Alternativt klicka på den stora röda knappen “Create Group” i den högra sidopanelen.
Ett pop up-fönster dyker upp på skärmen. Skriv in önskat namn på gruppen under “Group Name”.
💡 Namnet kan vara till exempel ett namn på ett område, där tanken alltså är att du placerar alla skärmar som finns på det området i den mappen. Namnge grupper och skapa den struktur som passar bäst för just din organisation!
Klicka på den röda knappen “Create Group” för att spara dina ändringar.
Redigera en skärmgrupp
❗️Denna funktion är bara tillgänglig för dig som är Local Administrator i din organisation. Kontakta din organisations kontoägare i PicFlow om du sitter på en position som borde vara markerad som Local Administrator.

Klicka på den grupp du vill redigera. En röd ram visas runt din valda grupp, för att indikera att den är markerad.

Redigeringsalternativ blir tillgängliga i den högra sidopanelen

I den högra sidopanelen är din skärmgrupps layouter sorterade under två flikar för orientering, “Vertical” och “Horizontal”.
Under respektive flik visas en lista över de layouter som används i gruppen.
I exempelbilden ovan ser du gruppens vertikala layouter.
Bredvid varje layoutnamn anges hur många skärmar i gruppen som använder just den layouten.

Du kan rotera och starta om dina skärmar genom att klicka på ikonerna under listan med layouter.
💡 Tips! Håll muspekaren över ikonerna för att se vilken funktion de har.

Byt namn på gruppen genom att skriva ett nytt namn i inmatningsfältet under ”Group Name”.

Vill du flytta din skärmgrupp in i en annan, välj en överordnad mapp i listan under ”Parent Group”.
“Alla skärmar” gruppen har ingen överordnad mapp, därför är fältet blankt.

Klicka på knappen ”Layout Swap” för att byta layout för alla skärmar i din skärmgrupp.

Klicka på den röda knappen “Save Changes” för att spara dina ändringar.
Överblicka en skrämgrupp
I Screen Groups sektionen kan du se information om gruppen och de skärmar som ingår i den.
Nedan går vi igenom infon som finns tillgänglig i varje skärmgrupps behållare.

Den här gruppen heter ”Stockholm”.

”Stockholm” är en undergrupp till skärmgruppen ”Alla skärmar”. “Alla skärmar” visas till vänster om gruppens namn, och är alltså överordnad till Stockholm.
💡 I PicFlow används begreppet Parent Group för huvudgrupp.
Du kan använda pilen för att navigera tillbaka till huvudgruppen.

Om den aktuella skärmgruppen har egna undergrupper, visas dessa längst ned i behållaren.
”Stockholm” har flera olika undergrupper. Navigera till respektive undergrupp genom att klicka på namnet eller navigeringspilen.

I behållaren visas antal Screens, skärmar och Groups, undergrupper, som den aktuella skärmgruppen innehåller.
”Stockholm” innehåller 6 skärmar och 4 undergrupper.

Till höger om dessa kan du se orientering för skärmarna i gruppen.
Gruppen ”Stockholm” har 0 liggande, horisontella layouter och 6 stående, vertikala layouter.

I behållaren visas även status för gruppens skärmar. Grön indikerar att skärmen är online, grå indikerar att skärmen inväntar installation och röd indikerar att skärmen är offline.
I skärmgruppen ”Göteborg” ligger alla skärmar som gråa, vilket innebär att de inväntar installation
Ta bort en skärmgrupp
❗️Denna funktion är bara tillgänglig för dig som är Local Administrator i din organisation. Kontakta din organisations kontoägare i PicFlow om du sitter på en position som borde vara markerad som Local Administrator.

Klicka på ikonen med de tre vertikala punkterna, till höger om gruppens namn, och välj ”Delete”.
Ett pop up-fönster dyker upp på skärmen där du behöver bekräfta borttagningen av mappen.
Screens

I Screens sektionen på höger sida av skärmen, ser du dina skärmar.
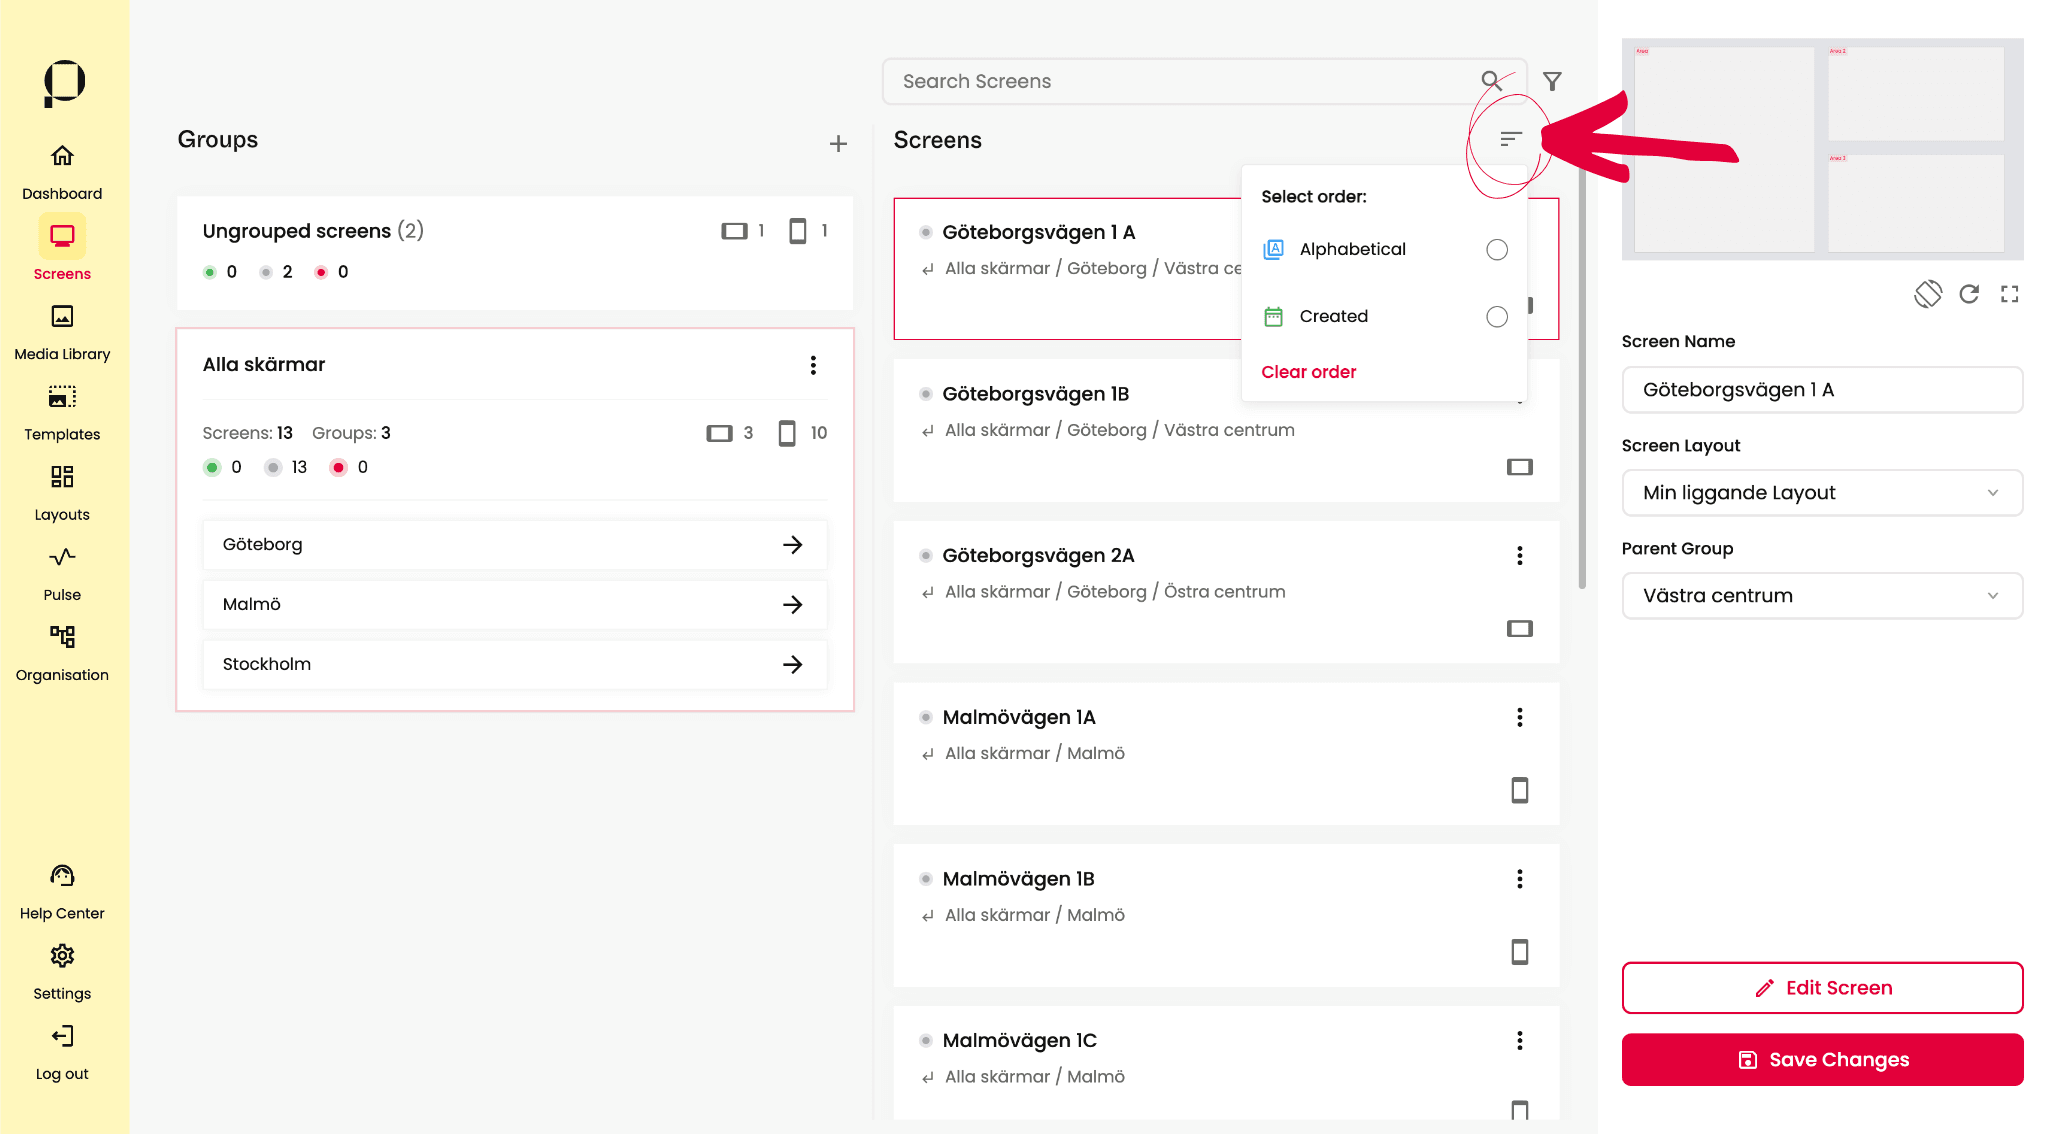
Tryck på list-ikonen för att öppna val för sortering. Du kan välja att sortera skärmlistan efter alfabetisk ordning, eller utifrån i vilken ordning skärmarna lades till.
Hantera en skärm

Klicka på den skärm du vill hantera. En röd ram visas runt din valda skärm, för att indikera att den är markerad.

Redigeringsalternativ blir tillgängliga i den högra sidopanelen.

Sidomenyn innehåller en visning av skärmens aktuella innehåll, följt av en rad av tre symboler som ger dig möjlighet att rotera skärmen, uppdatera skärmen och öppna skärmen i en större vy.
💡 Håll muspekaren över respektive symbol för att se vilken funktionalitet de erbjuder.

Scrollar du längre ned på skärmen, ges du möjlighet att redigera skärmens namn under “Screen Name“.
Byt layout för skärmen i listan under “Screen Layout“.
📖 Läs mer om att byta layout i avsnittet “Tilldela layout till skärm”, navigera dit genom att klicka här.
Flytta skärmen till en annan skärmgrupp under “Screen Group“.
❗️Funktioner relaterade till skärmgrupp är bara tillgängliga för dig som är Local Administrator i din organisation. Kontakta din organisations kontoägare i PicFlow om du sitter på en position som borde vara markerad som Local Administrator.
Expandera infobehållaren genom att klicka på raden för “Info“. Scrolla ner för erhålla information om den faktiska skärmen (hårdvaran).

Genom att trycka på “Edit Screen” tas du vidare till publiceringsvyn, för att publicera eller editera ditt skärminnehåll.
📖 Läs mer om att publicera innehåll till skärm i avsnittet “Publicera”, navigera dit genom att klicka här.

Klicka på den röda “Save Changes” knappen för att spara dina ändringar.
Sök efter en skärm

För att söka efter en eller flera skärmar, använd sökfältet högst upp på sidan. Klicka i fältet och skriv in söktext. Du söker på skärmens namn.

Sökresultatet visar grupper som innehåller matchande skärmar. Även här navigerar vi alltså till våra skärmar genom grupper.
Vi går igenom hur detta fungerar nedan:
Exempelvis, om du som i detta exempel söker på “Huvudkontor” visas skärmen direkt i listan, eftersom den tillhör standardgruppen “Ungrouped Screens” som du befinner dig i.
💡 Den röda ramen runt gruppen indikerar att du befinner dig i den.

I detta exempel söker vi istället på “Vasagatan”, och kan i “Groups”-sektionen se att vi har skärmar vars namn min sökning i “Alla skärmar”-gruppen. Bara grupper som innehåller skärmar som matchar söktexten visas i “Groups”-sektionen.
💡 Gruppen “Ungrouped Screens” är ett undantag, då den alltid är synlig i listan.
Vi klickar på “Alla skärmar”, och de matchande skärmarna blir synliga i listan, likt i bilden ovan. Om vi istället står i “Ungrouped Screens” visas att inga matchande skärmar finns i den gruppen.

Antalet matchande skärmar visas efter “Screens” för varje grupp.
Filtrera skärmar

För att filtrera skärmar, klicka på filter-symbolen.

En meny blir synlig. Klicka på toggle-symbolerna för att styra vilka skärmar du vill visa.
Filtreringen sker genomgående i alla grupper. Du ser, likt för sökfunktionaliteten ovan, grupper med skärmar vars status matchar din filtrering i “Groups”-sektionen. Klicka dig in på gruppen eller grupperna för att se skärmarna.
💡 Du kan självklart använda filtrering och sökfunktionalitet i kombination.
Tilldela layout till skärm
Om vill lägga till en ny eller byta layout på en av dina skärmar, börja med att välja skärm genom att markera den. En röd ram visas runt din valda skärm, för att indikera att den är markerad.
Redigeringsalternativ blir tillgängliga i den högra sidopanelen. Sidopanelen till höger på skärmen visar skärmens detaljer. Scrolla ner till du ser “Screen Layout“.

Klicka på fältet under “Screen Layout” för att öppna en dropdown meny. Välj din önskade layout i listan.
Tryck på “Spara” för att spara dina ändringar. Du har nu gett skärmen en ny layout, för dig att publicera i!
Publicera
I detta avsnitt går vi igenom hur du publicerar innehåll till dina skärmar. Du kan publicera till en eller flera skärmar
Publicera till en skärm

Klicka på den skärm du vill publicera. En röd ram visas runt din valda skärm, för att indikera att den är markerad.

Redigeringsalternativ blir tillgängliga i den högra sidopanelen.

Klicka på knappen “Edit Screen” för att komma till publiceringsvyn. Läs mer om publiceringsvyn i nästa avsnitt, “Pubiceringsvyn”.
Publiceringsvyn
Efter att ha klickat på “Edit Screen” kommer vi till publiceringsvyn. Här hanterar du vilket innehåll som visas i skärmens olika ytor, så kallade areas. Du kan lägga till, redigera eller ta bort innehåll i varje area, exempelvis bilder, video, widgets eller annat material. De ändringar du gör publiceras direkt till skärmen när du trycker på “Publish“.

I publiceringsvyn har du tillgång till ett verktygsfält i skärmens ovankant, och en sidopanel på skärmens högra sida.
Verktygsfältet

I verktygsfältet ser du namnet på den skärm du redigerar. Till vänster om namnet ser du även grupphierarkin som gruppen befinner sig i. Du kan alltså alltid kontrollera var du publicerar ditt innehåll, genom textraden i verktygsfältet.
💡 Navigera tillbaka till Screens genom att klicka på pilen längst till vänster

Du kan se skärmens status i verktygsfältet.
Denna skärm visar en grå prick, vilket indikerar att skärmen väntar på installation.
💡 Grön indikerar att skärmen är online, grå indikerar att skärmen inväntar installation och röd indikerar att skärmen är offline.

Genom de efterföljande symbolerna har du möjlighet att rotera skärmen (1), redigera hela skärmgruppen (2) och expandera skärmens stolek i publiceringsvyn (3).
📖 Läs mer om att redigera och publicera till hel skärmgrupp i avsnittet “Publicera till flera skärmar samtidigt” här.

Den röda knappen “Publish” används för att publicera dina ändringar till den faktiska skärmen.

Genom att trycka på de tre vertikala prickarna, ges du möjlighet att radera din skärm direkt från publiceringsvyn.
Sidopanelen

Under “Screen Layout” ser du din valda layout för den aktuella skärmen. Du kan inte byta layout från publiceringsvyn.
Under layoutnamnet ser du även detaljer kring skärmen upplösning och bildförhållande.

Under “Areas” finns skärmens ytor listade.
För att publicera i en yta kan du klicka på ytans namn i listan, eller klicka direkt på ytan i förhandsvisningen av skärmen. Vi går igenom detta i nästkommande avsnitt, “Publicera innehåll”
Publicera innehåll

Börja med att välja en en area att publicera i. Klicka på ytans namn i listan, eller klicka direkt på ytan i skärmen.
💡 Areas är uppsatta via din valda layout. Läs mer om layouter och ytor i avsnittet “Layouts”.

När du valt en area, visas areans playlist i den högra sidopanelen.
En playlist består av det innehåll du vill visa i den valda ytan. Det är alltså en spellista över det objekt du lägger till i en yta. Objekten visas som ett bildspel, eller som i en spellista i ytan.

I exemplet på bilden använder vi oss av Picflows standardlayout, och har valt ytan “Mina sidor”. I spellistan för ytan “Mina sidor” finns ett publicerat objekt, en template som också heter “Mina Sidor”.

För att lägga till ytterligare ett objekt, tryck på den röda knappen “Add Content” .

Contentväljaren visas på din skärm. Välj mellan Media i den övre sektionen, och Templates i den undre sektionen.
Du kan välja att lägga upp en befintlig mediafil eller befintlig template. Du kan även ladda upp nya mediefiler direkt i denna vy, eller skapa en ny template för den valda ytan.
Lägg till en mediefil
Du kan välja att både ladda upp en ny mediefil, och addera en befintlig. I det här exemplet adderar vi en befintlig, redan uppladdad bild.

Vi väljer “Browse media library” för att visa Media library på skärmen.

Klicka på den fil du vill lägga till. En röd ram runt objektet indikerar att objektet är valt. Tryck sedan på den röda knappen “Add“.
💡 Håll in shift-tangenten och markera flera objekt, om du vill lägga till fler objekt på samma gång.

Vi får nu upp alternativ för schemaläggning av objektet i ett nytt pop up-fönster.
Om du vill att ditt valda objekt alltid ska visas i din spellista, fortsätt med default inställningen “Always show” och tryck på “Save“. Du behöver alltså inte ändra eller ange något om du vill lägga till objektet utan någon schemaläggning.
Om du vill att ditt valda objekt bara ska visas under en begränsad period eller vid en specifik tidpunkt kan du istället trycka på “Schedule“. Vi går igenom inställningarna för schemaläggning igenom i avsnittet “Schemalägg objekt” längre ned i detta avsnitt.
📖 För att läsa mer om hur du ställer in schemaläggning för objekt, se avsnittet “Schemalägg objekt” här.
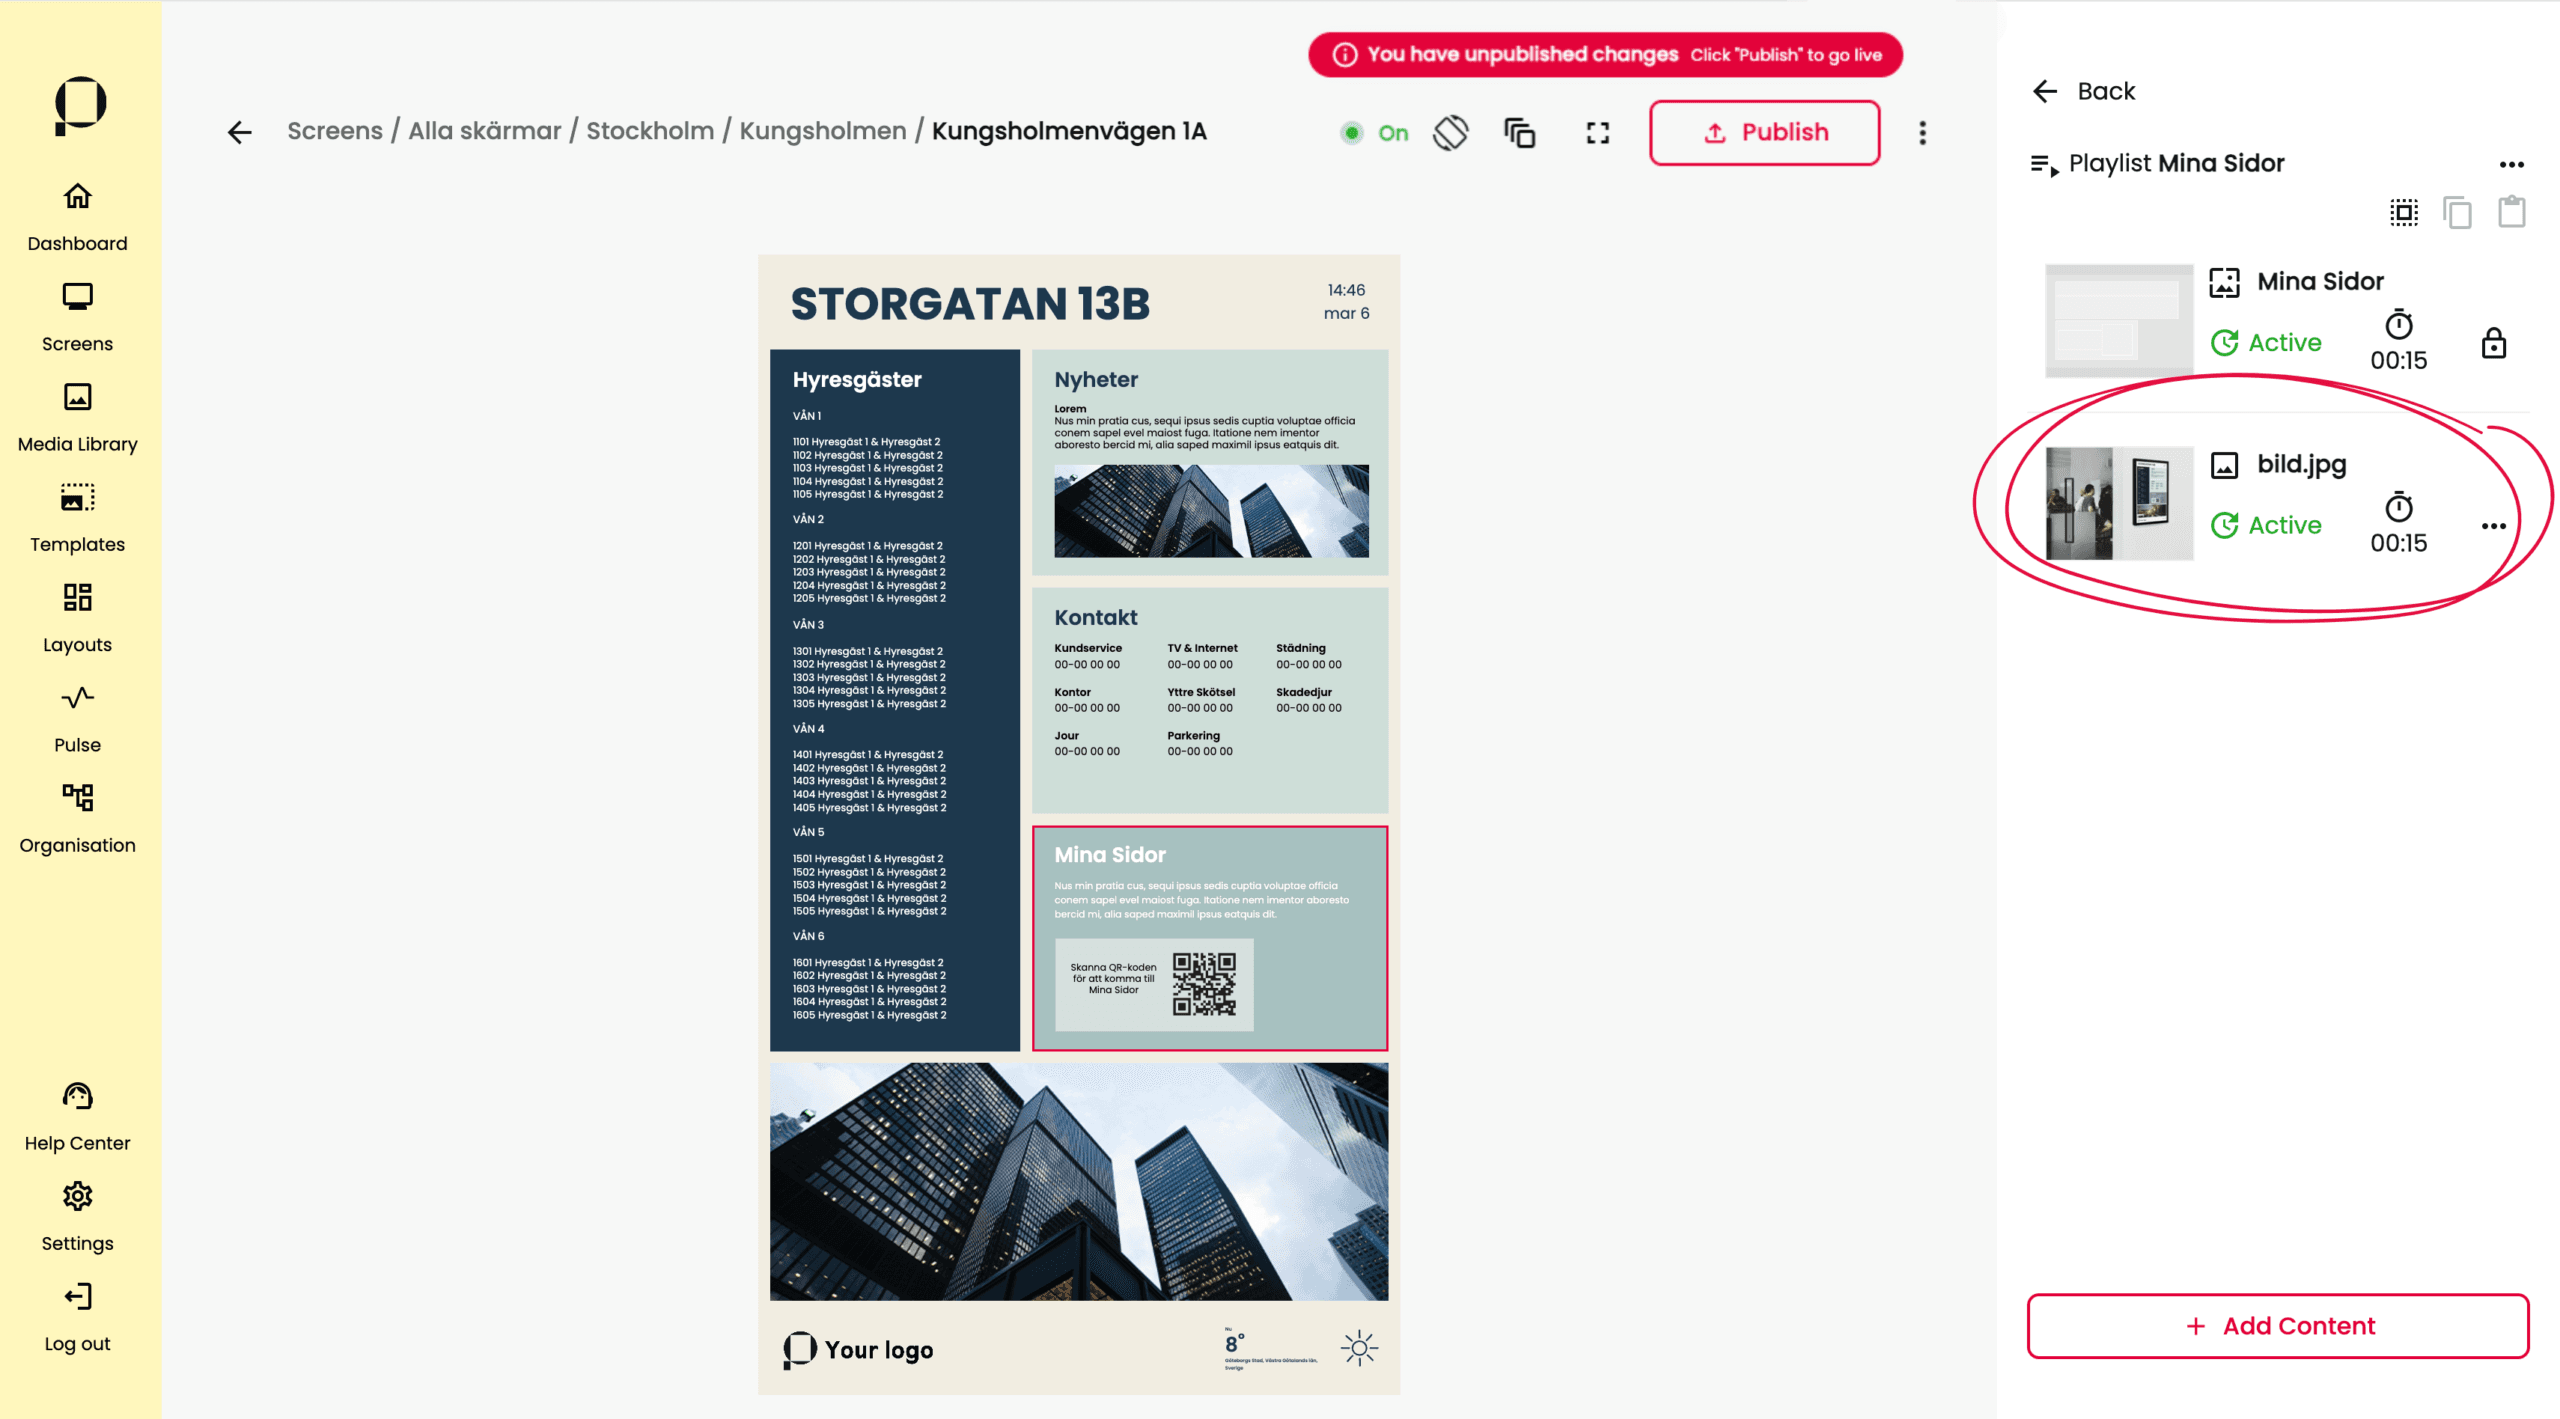
Vår tillagda mediefil syns nu i ytans playlist!
💡 Tips! Dra det nya objektet högst upp i spellistan för att se hur det ser ut på skärmen.
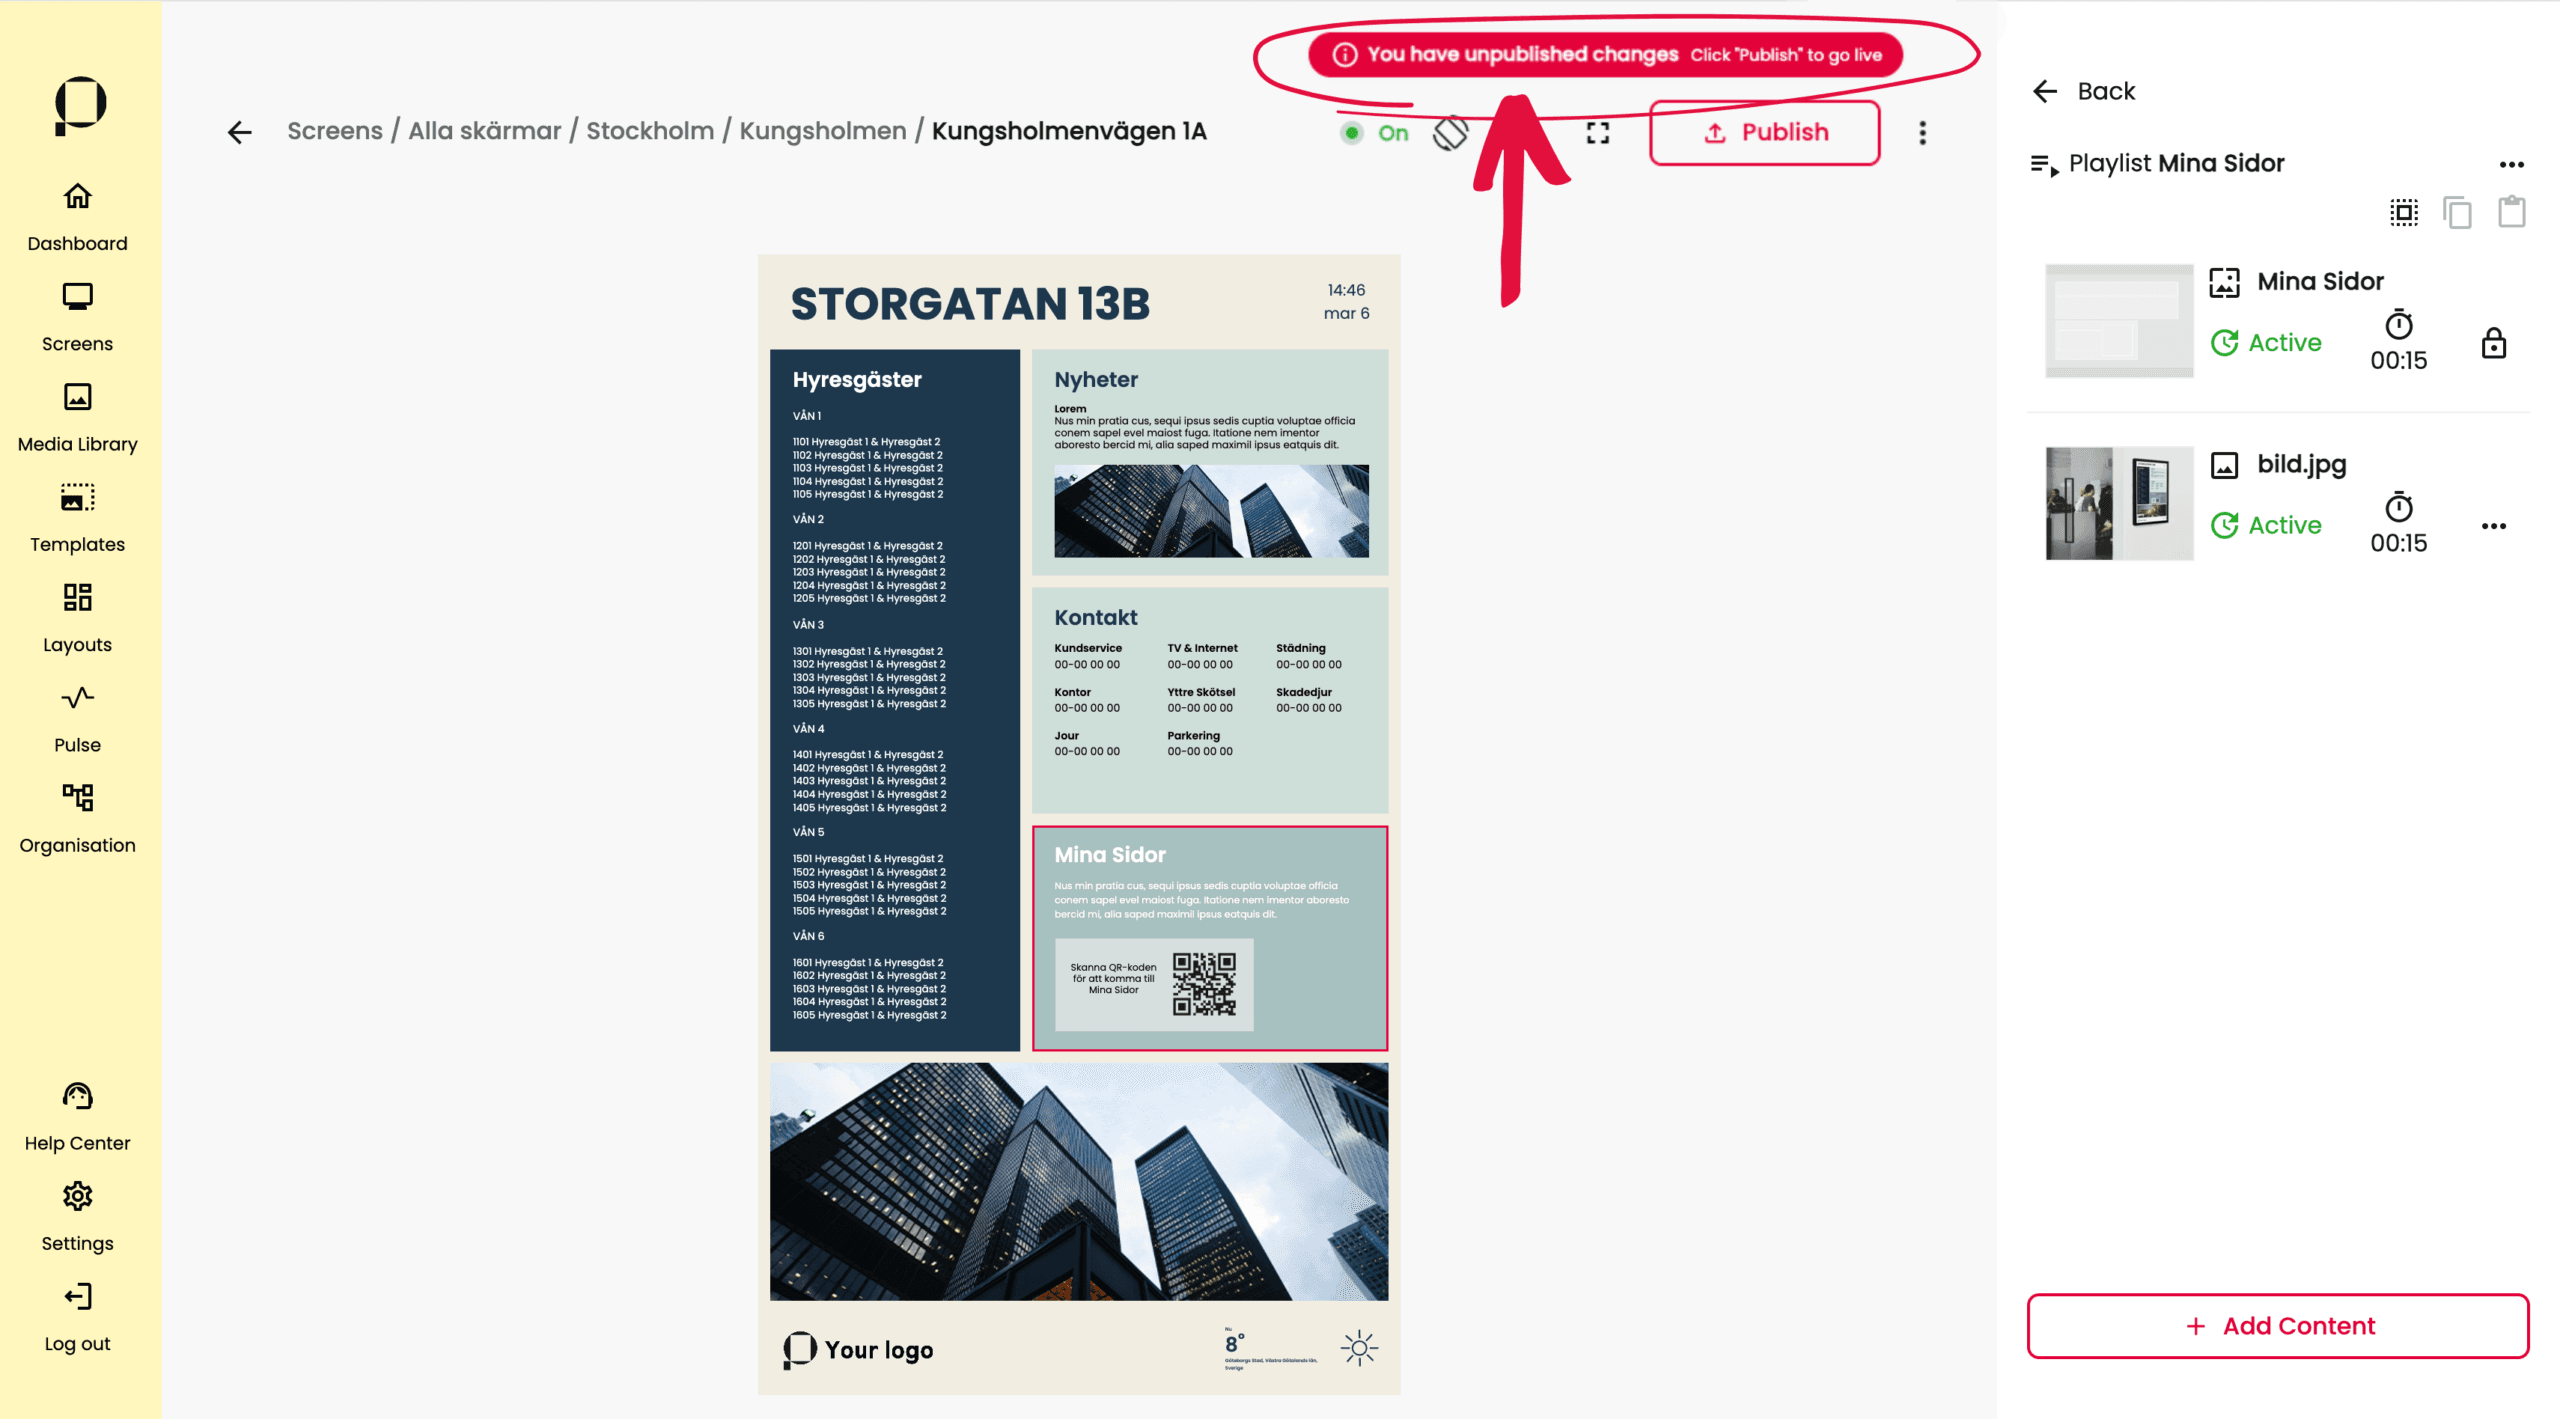
När vi har opublicerade objekt i en spellista, visas en banner som påminner dig om att publicera dina förändringar så de går live på skärmen.

För att publicera dina förändringar till den faktiska skärmen, tryck på “Publish” .
Lägg till en template
Du kan välja att både skapa en template till ytan, och att addera en befintlig, redan skapad template. I det här exemplet adderar vi en befintlig template.
💡 Tips! När du skapar template från denna vy, för en specifik yta för templaten automatiskt rätt mått för att passa ytan.

I det här exempelet laddar vi upp en redan befintlig template, “”.
I templateväljaren markeras templates som passar din yta, alltså har samma mått, med markeringen “Right Size” i rött i högra hörnet.
För att även se templates som inte matchar storleken på ytan du redigerar spellista för, toggla av “Area size” i vänstra hörnet.
💡 Vi rekommenderar att du använder en template med samma storlek som arean.

Objektet dyker nu upp i din playlist.
💡 Tips! Dra det nya objektet högst upp i spellistan för att se hur det ser ut på skärmen.
För att publicera dina förändringar till den faktiska skärmen, tryck på “Publish” .
Publicera till flera skärmar samtidigt
För att publicera till flera skärmar inom samma skärmgrupp, börja med att välja gruppen i sektionen Screen Groups till vänster på skärmen.

Klicka på den grupp du vill publicera i, på bilden ovan har vi valt skärmgruppen “Vasastan” och vill alltså publicera innehåll på alla skärmar i den gruppen.
Viktitgt! Kontrollera att gruppen använder samma layout på alla skärmar. I denna grupp används endast en layout, “Min stående layout”.
❗️Det är ett krav att alla skärmar använder samma layout, för att kunna publicera på gruppnivå.

Klicka på layouten i den högra sidopanelen.

Välj sedan “Edit Screens“.
💡 Precis under layoutvisningen i sidopanelen kan du se antal skärmar i gruppen du redigerar. I exemplet ovan redigerar vi en grupp med 2 skärmar (inringat i rött).

Vi hamnar nu till publiceringsvyn. I verktygspanelen högst upp på sidan visas vilken grupp och layout vi redigerar.
📖 Läs mer om hur du jobbar i publiceringsvyn i avsnittet “Publiceringsvyn”. Navigera dit genom att klicka här.

Klicka på den area du vill publicera i.
I det här exemplet vill vi publicera en bild i arean “Area 2”.

Klicka på “Add Content” för att öppna contentväljaren.
📖 Läs mer om hur du lägger till innehåll i ytor från contentväljaren i avsnittet “Publicera innehåll”, navigera dit genom att klicka här.

Det uppladdade objeket syns nu i spellistan. Klicka på ”Publish” längst upp till vänster i verktygsfältet. Din publicering är nu synliga på alla skärmar i skärmgruppen!
Hantera objekt i en playlist

Genom att trycka på de tre prickarna till vänster i objektets behållare, öppnas en dropdown meny. Denna ser lite olika ut beroende på om det är en mediefil eller en template. Vi går igenom innehållet för båda i varsitt avsnitt nedan.
Hantera mediefiler i en playlist

Dropdown-menyn ger dig följande alternativ för hantering av din template.
Edit item name
Ger dig möjlighet att redigera objektets namn i din playlist.
Schedule
Öppna pop up-fönster för schemaläggning av det specifika objektet.
📖 Läs mer om schemaläggning i nästkommande avsnitt, “Schemalägg objekt”. Navigera dit genom att klicka här.
Set priority
Öppna pop up-fönster för prioritering av det specifika objektet.
📖 Läs mer om prioritering i kommande avsnitt, “Prioritera objekt”. Navigera dit genom att klicka här.
Remove item
Ta bort objektet ur spellistan.
Fit content
Välj hur din fil ska visas i arean under “Fit Content”. Du har följande alternativ att välja på:
Original
Visar videon i originalstorlek och format, utan justeringar. Om videon är större än behållaren kan delar beskäras. Om den är mindre kan tomrum uppstå runt videon.
Contain
Skalar videon så att hela bilden får plats inom behållaren. Hela videon syns, men det kan uppstå tomrum om bildens proportioner inte matchar behållaren.
Fill
Skalar videon för att fylla hela behållaren. Inget tomrum visas, men videon kan bli utdragen eller förvrängd om proportionerna skiljer sig mycket från behållarens.
Fit
Anpassar videon så att den passar behållaren. Om behållaren är mindre än videon, beskärs delar för att undvika att ändra proportionerna.
Hantera templates i en playlist

Dropdown-menyn ger dig följande alternativ för hantering av din template.
Edit template
Öppnar redigeringsvyn för den befintliga templaten, för att redigera innehållet.
Edit item name
Ger dig möjlighet att redigera objektets namn i din playlist.
Duplicate item
Duplicerar objektet i spellistan.
💡 Du kan även kopiera objekt mellan spellistor. Se hur i avsnittet “Kopiera och klistra in objekt mellan playlists”.
Schedule
Öppna pop up-fönster för schemaläggning av det specifika objektet. Läs mer om schemaläggning i nästkommande avsnitt, “Schemalägg objekt”.
Set priority
Öppna pop up-fönster för prioritering av det specifika objektet. Läs mer om prioritering i kommande avsnitt, “Prioritera objekt”.
Remove item
Ta bort objektet ur spellistan.
Schemalägg objekt

Börja med att klicka på de tre prickarna till höger i objektets behållare. Välj “Schedule” i rullgardinsmenyn.
💡 Detta klick öppnar samma pop up-fönster som visas vid när man adderar mediefiler eller templates till en playlist.
Du kan alltså följa instruktionerna nedan, även om du håller på att lägga till ett nytt objekt i en spellista.

Ett pop up-fönster för schemaläggning öppnas på skärmen. För att schemalägga objektet, klicka på “Schedule“.

I det första fältet, “How do you want to schedule this object” finns två alternativ och välja mellan:
From & to date – Används när du vill visa objektet under en specifik tidsperiod, med angivet start- och slutdatum.
Advanced Schedule – Lämpligt för återkommande visningar, till exempel om objektet ska visas samma veckodag varje vecka eller enligt ett specifikt schema.
Vi går igenom hur du använder båda alternativen nedan.
From & to date

Klicka på fälten för “When will it start to appear” och “When will it stop to appear” för att öppna kalenderapplikationen och välja de datum du vill att ditt content visas.

När du valt start- och slutdatum, spara dina val genom att trycka på den röda knappen “Save“.
💡 Det finns inget krav på att sätta ett slutdatum. Du kan lämna det fältet tomt om du vill att ditt objekt ska visas tillsvidare.

Ett schemalagt objekt i en playlist indikeras av ett timglas.
Innan din valda tidsperiod visas även den blåa texten “Scheduled“.
När din inställda tidsperiod påbörjat, byts “Scheduled” ut mot den gröna “Active“-texten, för att indikera att objektet är aktivt på skärmen.

Glöm inte att trycka på “Publish” för att publicera dina ändringar till skärmen!
Advanced Schedule

Under “Days and hours” type kan du välja mellan alternativen “Same hours each day” och “Different hours“.

“Same hours each day” innebär precis som namnet antyder, att du schemalägger objektet samma tider alla dagar.
Markera dagar genom att klicka på dem, och sätt ett tidspann genom att dra i markörerna. I exemplet i bilden ovan schemaläggs ett objekt måndag till fredag, mellan klockan 9 och 18.

“Different hours” innebär att du väljer unikt tidspann för varje dag.
Markera dagar genom att klicka på dem, och sätt ett tidspann genom att dra i markörerna. I bilden ovan schemaläggs ett objekt måndag , tisdag och onsdag, under tre olika tidsspann.

Du kan även lägga en till en bestämd tidsperiod när du använder “Advanced Schedule“. Klicka på fälten för “When will it start to appear?” och “When will it stop to appear?” för att ställa in ditt tidsspan med hjälp av kalenderapplikationen.
💡 Det fungerar fint att bara ange ett startdatum, det finns inget krav på att sätta ett slutdatum. Du kan lämna det fältet tomt om du vill att ditt objekt ska visas tillsvidare.
Om fälten lämnas blanka, likt ovan, gäller schemat för innehållet tills vidare.

Avsluta med att trycka på den röda knappen “Save“.
Prioritera objekt

Börja med att klicka på de tre prickarna till höger i objektets behållare. Välj “Set Priority” i rullgardinsmenyn.

Ett popup-fönster för prioriteringsinställningar öppnas. För att tilldela en prioritetsnivå till objektet, klicka i fältet under “How do you want to prioritize this object?”
Du kan välja mellan:
- Standard
- Priority
- Fallback
Standard
Standard innebär att ditt objekt har standardprioritet och därmed beter sig som ett “vanligt” objekt. Det är en del av ytans ordinarie spellista.
💡 Om inget annat anges är objektet per default prioriterat som standard.
Detta alternativ finns framför allt för att kunna ange att objekt inte längre ska vara Priority eller Fallback.
Priority
Om du sätter ett objekt som “Priority” innebär det att visningen av de övriga objekten i spellistan prioriteras ned, till fördel för Priority-objektet. Det är alltså bara det eller de objekt som är satta som Priority som visas, om det finns ett Priority objekt i din playlist.
💡 Till exempel: Om din playlist innehåller 4 objekt totalt, och du markerar ett som Priority visas bara detta objekt, och de övriga 3 objekten döljs.
💡 Flera objekt kan sättas som priority.

Ett Priority-objekt markeras med en röd indikator “Prio” i listan i en playlist.
Övriga objekt visas som “Deprioritized“, vilket indikerar att de för nuvarande inte visas i arean eftersom ett annat objek är prioriterat.
Fallback
Om du arbetar mycket med schemaläggning eller prioritering i din area, kan det vara en bra idé att ha ett “Fallback” objekt.
Att sätta ett objekt som “Fallback” innebär att det visas om ytan saknar annat innehåll att visa.
❗️Fallback-objekt visas alltså bara om ytan saknar annat innehåll, och är inte en del av areans visade innehåll om det finns andra objekt som är inställda att visas, t.ex. standardobjekt eller schemalagda objekt.

Ett Fallback-objekt markeras med en grå pil-symbol i listan i en playlist.
Låsta objekt i en playlist

Om du ser ett objekt med en låsikon i en playlist, innebär det att publiceringen av objektet är gjord för en hel skärmgrupp. Du kan därför inte redigera eller ta bort objektet för en specifik skärm.
Genom att hålla muspekaren över låsikonen visas den gula informationsrutan, likt på bilden ovan. Tryck på länken “go to the group“, för att komma till gruppen där publiceringen av objektet gjort, och hanteraobjektet därifrån.
Kopiera och klistra in objekt mellan olika playlists
I vissa fall kan det vara användbart att kopiera ett eller flera objekt från en playlist för att sedan klistra in dem i en annan, exempelvis för att återanvända innehåll eller effektivisera arbetet med skärmar eller ytor som ska visa liknande innehåll.

Klicka på symbolen för select (den lilla rutan omringad av en annan streckad ruta). Detta klicket aktiverar kryssrutor för dina playlistobjekt. Du hittar rutorna i det övre vänstra hörnet av varje objekt.

Markera de objekt i spellistan som du vill kopiera. Du kan välja ett eller flera objekt.

När det finns objekt markerade så tänds symbolen för att kopiera. Klicka på den för att kopiera innehållet. Du får en bekräftelse på skärmen om att innehållet är kopierat.

När det finns kopierade objekt tänds symbolen för att klistra in.

Navigera till den area med tillhörande playlist som du vill klistra in objekten i, och tryck på symbolen för att klistra in.
💡 Du kan klistra in objekten både i andra areas på samma skärm, eller i en helt annan skärms area.

Dina kopierade objekt dyker nu upp i spellistan.
Back to Top